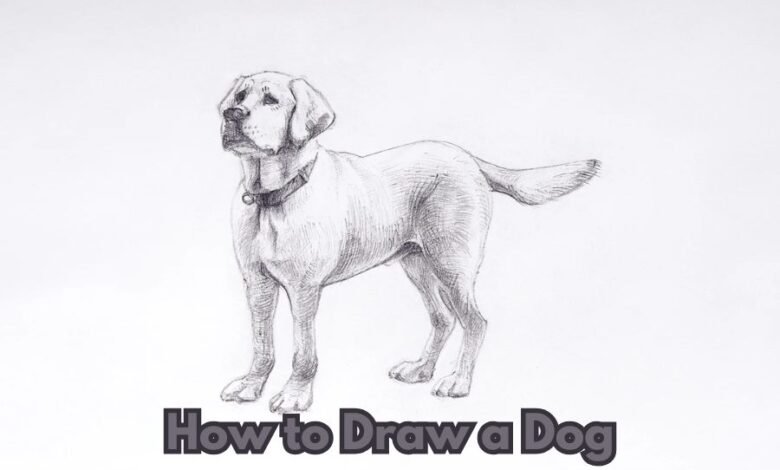
Learning how to draw a dog can be fun and easy if you follow the proper steps! Whether you’re a beginner or want to improve your skills, this step-by-step guide will help you create a cute and realistic dog drawing. You don’t need to be an expert—grab your pencil, and let’s get started!
Dogs come in all shapes and sizes, but the basic method of drawing a dog remains the same. You can create a perfect sketch using simple shapes and following key techniques. This guide will show you how to draw a dog in different poses, add realistic details, and even bring your drawing to life with colors.
Simple Steps to Draw a Dog from Scratch
Starting with a few simple shapes makes drawing a dog much more straightforward. Begin by sketching three circles—one for the head and two for the body. These basic shapes help you get the proper proportions.
Next, add a smaller circle for the muzzle and connect the body with smooth lines. Draw guidelines for the legs and tail, making sure they look natural. Light sketching helps in adjusting the shape before adding details.
Now, refine the body by shaping the legs and ears. Make the legs slightly thicker at the top and thinner near the paws. The ears can be floppy or pointy, depending on the dog you want to draw.
Finally, erase extra lines and darken the outline. Add details like fur texture, eyes, and nose to bring your dog to life. Your drawing is now complete!
How to Draw a Dog Using Basic Shapes
Using simple shapes is the best way to start drawing a dog. Circles, ovals, and lines make it easy to build the body structure before adding details.
First, draw a large oval for the body and a smaller one for the head. Add a small circle for the muzzle and sketch lines for the legs and tail. These guidelines will help in keeping the proportions correct.
Once you have the base, begin refining the shape. Smooth out the lines and adjust the legs for a natural bend. Depending on the dog’s breed, the tail can be curved or straight.
After finalizing the shape, erase extra guidelines and add details. Carefully draw the eyes, ears, and nose. Adding some fur texture will make the drawing look more realistic.
Mastering Dog Proportions: Draw a Dog Like a Pro
When drawing a dog, it is important to get the right proportions. The dog’s body should be balanced so that it looks natural.
First, divide the body into three main sections: head, chest, and hind legs. The chest should be slightly larger than the head, and the hind legs should be proportionate to the front legs.
The legs must be the correct length and positioned correctly. A dog’s back legs bend differently than the front ones, so pay attention to their structure.
Adding a curved line along the spine will help you place the legs correctly. Once everything looks correct, finalize the sketch and start adding details.
How to Draw a Dog Face with Easy Techniques
Drawing a dog’s face is one of the most fun parts! The face gives personality and expression to your drawing.
Start with a circle as a base for the head. Then, add a small oval for the muzzle. Place the eyes above the muzzle and sketch the nose at the tip.
The ears can be straight or floppy, according to the breed. Use curved lines to shape them naturally. Make sure both ears are symmetrical to maintain balance.
Once the bare face is ready, add details like fur patterns, whiskers, and shading. Light shading around the eyes and nose will make the drawing look more realistic.
How to draw a dog Ears: Floppy or Pointy?
Dog ears are available in a variety of dimensions and shapes. Some dogs have tall, pointy ears, while others have soft, floppy ones.
Start by drawing the basic ear shape. For floppy ears, use curved lines that hang down. For pointy ears, draw sharp, triangular shapes.
Make sure both ears are placed evenly on the head. If the dog is in a side view, only one ear will be visible.
Adding a few lines inside the ears will give them depth. It is also possible to add fur texture in order to make your appear more natural.
Drawing Dog Eyes: Expressive and Cute
Dog eyes show emotions like happiness, curiosity, or excitement. Drawing them correctly will bring your dog to life.
Start by sketching two almond-shaped eyes. If the dog is looking straight, keep both eyes the same size. For a side view, one eye will be smaller.
Add a small circle inside each eye to show light reflection. This makes the eyes look shiny and realistic.
Use shading around the eyes to create depth. The darker the shading, the more expressive the eyes will look.
How to Sketch a Dog’s Nose with Simple Steps
A dog’s nose is small but full of detail. It has a rounded shape with tiny bumps and nostrils. The nose also looks slightly wet, which gives it a shiny effect.
Start with a triangle or oval for the base shape. Then, add two small circles for the nostrils. Make sure they are even and placed in the correct position.
Next, connect the nostrils with curved lines and shape the nose tip. To make it look more natural, add slight curves around the edges.
To make it realistic, use shading and tiny dots for texture. Darker areas will create depth, while lighter spots will give it a glossy, wet look.
Drawing a Dog’s Mouth: Smiling or Relaxed
A dog’s mouth changes its whole expression. It can look happy, sleepy, or excited. Some dogs have big smiles, while others have a calmer look.
For a smiling dog, draw a curved line from one side of the muzzle to the other. Add small lines at the ends to lift the smile. A relaxed mouth will have a softer curve or a straight line.
If the mouth is open, sketch a soft curve for the tongue. The tongue often curls up a little, giving the dog a playful look.
Shading around the mouth adds depth. Adding tiny whiskers and slight fur details can make the drawing more realistic.
How to draw a dog Legs in the Right Position
Dog legs bend differently than human legs, so getting the shape right is essential. Front legs are straighter, while back legs have an apparent bend near the knee.
Start by drawing straight lines as guides for the legs. Add small circles where the joints will be. This helps in keeping the proportions correct.
Keep the front legs straight but slightly curved near the paws. The back legs should bend more to show the strong muscles.
Once the basic shape looks right, add muscle definition and fur. Erase extra guidelines and finalize the outline with smooth strokes.
Drawing a Dog’s Paws: Simple and Realistic
Dog paws are soft but have strong pads and claws. They help the dog run, jump, and grip the ground. Getting them right makes the drawing more realistic.
Begin with a rounded base shape for the paw. Then, add four small ovals for the toes. Keep the size balanced with the rest of the body.
Next, draw tiny claws at the tip of each toe. Some dogs have more extended claws, while others have very short ones.
To make them look real, add shading under the paws. Small fur strokes around the toes will give a soft and fluffy effect.
How to draw a dog Tail: Curly or Straight?
A dog’s tail can be long, short, curly, or fluffy. It helps show emotions, like happiness when wagging or alertness when stiff.
Begin by drawing a basic curve for the base of the tail. Using zigzag lines to create the fur effect if the tail is fluffy.
For a curled tail, use a spiral shape and make it thicker. A short tail can be drawn with a small, rounded tip.
Make sure the tail’s position matches the dog’s pose. Adding motion lines can make a wagging tail look more lively.
Adding Fur Texture to Your Dog Drawing
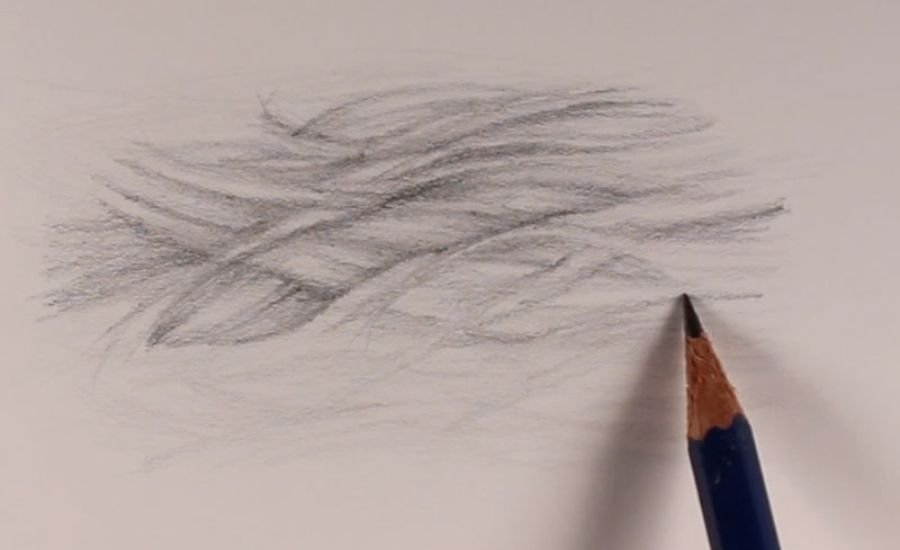
Fur texture makes a drawing look natural. Some dogs have short, smooth fur, while others have long, fluffy coats.
Use short, quick strokes for short-haired dogs. For long-haired dogs, draw wavy or zigzag lines to show volume.
Layer the strokes to add thickness. The chest, belly, and tail usually have more fur than other areas.
Shading helps create a fluffy look. Darker areas add depth, while lighter ones highlight the soft texture of the fur.
Drawing Different Dog Breeds with Easy Steps
Each dog breed has unique features. A Labrador looks different from a Poodle or a Bulldog.
Start with basic shapes and adjust the details. A long nose makes a Greyhound, while a flat face resembles a Pug.
Floppy ears belong to Beagles and Spaniels, while pointy ears are common in Huskies and German Shepherds.
Looking at real dog pictures will help. Adjust the eyes, ears, and muzzle while following the exact step-by-step process.
How to Draw a Puppy vs. an Adult Dog
Puppies and adult dogs have different body shapes. Puppies have more oversized heads, shorter legs, and rounder eyes.
When drawing a puppy, make the head slightly larger than the body. Keep the ears and nose small for a cute look.
Puppy legs should be short and chubby. A grown dog’s legs will be longer, stronger, and more muscle-defined.
Keeping the eyes big and shiny will make the puppy look playful. Adding soft fur will enhance the youthful appearance.
Recommended For You: UrbanLifeStyleVibe
How to Shade and Color Your Dog Drawing
Shading makes a drawing look more realistic. It adds depth and helps show light and shadow on the fur.
Begin with a base color which is in line with the fur of your dog. Then, add a darker shade for shadows to create dimension.
Lighter areas should have soft highlights. This technique makes the dog’s face, body, and legs stand out naturally.
Use a soft blending tool for digital art. If using a pencil, gentle smudging can create a smooth shading effect.
How to Draw a Dog in Motion: Running or Sitting
Dogs can be drawn in different poses, like sitting, running, or lying down. The position of the legs and tail changes with each pose.
For a sitting dog, bend the back legs while keeping the front legs straight. The tail usually rests on the ground or curves slightly.
A running dog has stretched-out legs. One set of legs is forward, while the other set is pushed back.
Adding motion lines can create a dynamic effect. Keep the body balanced to make the movement look smooth and natural.
Conclusion
Drawing a dog is fun and easy when you follow simple steps. Start with basic shapes, then add details like the nose, eyes, and fur. Each part of the dog makes it look more real, so take your time and enjoy the process. Don’t worry if it’s not perfect at first—practice will help you improve!
Keep trying different poses and dog breeds to improve your skills. Use shading and texture to make your drawing more realistic. Most importantly, have fun and be creative! Every dog drawing is unique, just like real dogs. Grab your pencils and begin drawing now!
FAQs
Q: What is the easiest way to start drawing a dog?
A: Start with simple shapes like circles and ovals to outline the head and body. Then, add details step by step.
Q: How can I make my dog drawing look more realistic?
A: Use shading and fur texture. Pay attention to small details like the nose, eyes, and ears.
Q: What is the best pencil for drawing a dog?
A: A soft pencil (like 2B or 4B) is excellent for sketching, and a harder pencil (like HB) helps with fine details.
Q: How do I draw a fluffy dog?
A: Use short, quick strokes for short fur and longer, wavy lines for fluffy fur. Layer the strokes for a natural look.
Q: How can I draw a puppy instead of an adult dog?
A: Make the head more significant than the body, draw rounder eyes, and keep the legs short and chubby.
Q: How do I fix mistakes in my drawing?
A: Use a kneaded eraser to lighten mistakes and redraw. Practicing helps you improve over time.
Q: Can I draw a dog without any experience?
A: Yes! Start with simple sketches and follow step-by-step guides. With practice, you will get better.
Read Next: UrbanLifestyleVibe.com